

Tips & Tricks for Self-Tanning At Home
Although I grew up in Florida, five minutes from the beach, I was never a sun tanner.
As a child, I have fond memories of going to the beach with my family, but as I got older, I just stopped going to the beach. While my sister was at the beach nearly every weekend, I preferred to stay covered up inside. Part of that stemmed from the fact that I wasn’t comfortable in a bathing suit, and partly because the beach wasn’t novel to me like it would be for someone who didn’t live in Florida. So I have always been pale!
When I lived in New York City, a few people asked me why I wasn’t tan if I was from Florida. That was such a silly question! First of all, I was living in NYC for 3 years; tans do not last that long! Second, I have light skin; I will never be super tan. Despite not wanting to go to the beach, I still wanted my legs to not look so white in dresses. So I started testing out self-tanners as a teenager, and have tried many different brands over the years.
Tips & Tricks for Self-Tanning at Home
I feel that I have a good handle on self-tanning now, and have my favorite products. Here I will share my tips and tricks to self-tanning at home! *This post contains affiliate links.
1. Before self-tanning, shave and exfoliate your skin.
Before self-tanning, I shave my legs in the shower and exfoliate anywhere that I will be using the self-tanner. Most of the time, I just self-tan my legs because my arms are a little darker naturally than my legs. But if I want a full-body tan, I exfoliate my face and whole body. I use a non-oily exfoliant so it washes clean. I like this exfoliator and this exfoliator.
2. After showering and exfoliating, moisturize dry spots.
I put a light moisturizer on the bottoms of my feet, my heels, and a little on my knees and elbows. If I am tanning my face, I put a little moisturizer around my nose and mouth, which is drier. This prevents the self-tanner from drying darker in those areas and settling into lines and creases. For my face, I like this moisturizer (save 15% with code ENG15). For my body, I have been using this moisturizer.
3. Now Be Patient!
This step is important. After showering and moisturizing, you’ll want to wait a little while before starting to apply self-tanner. I usually wait at least 45 minutes to an hour, to allow the moisturizer to sink in and allow your body temperature to adjust back to normal after your shower.
4. The Right Products Are Essential!
The self-tanner you use to very important. I have used some that leave steaks, no matter how careful I am. There are some that smell so bad that I won’t use them again. There are some that are great, but expensive. I found my favorite self-tanner that is affordable, only has a faint self-tan smell, and is streak-free. My favorite is St. Moriz Tanning Mousse, which is about $13. I have used both the medium and dark shades and like them both. If I’m in a rush and can’t prep my skin as I should, I stick to the medium, which leaves me about a shade darker. If I spend the time prepping, I love the dark shade! Since my skin is light, it doesn’t make me too dark; it’s just right and I look healthy!
You will also need to use a tanning mitt. If you don’t, even if you wash your hands right after, you will have orange or brown palms! My favorite mitt is from Amazon, linked here. It’s great because it doesn’t slide around on your hand while using and it makes it easy to navigate around knees, ankles, and toes!
5. Application
I always start with my lower legs and make my way up my body. I apply a couple pumps of the tanning mousse directly onto the tanning mitt, and start applying to my legs and tops of my feet. I spend time making sure it is rubbed in evenly, using circular motions. The St. Moriz tanner has a wash-off guide color, so you can see where you are applying, which is very helpful.
When tanning my arms, I also am very careful to rub the tanner in in circular motions, using sparingly on my elbows. Be sure to bend your elbows when applying over them to prevent uneven color. I bring the color up my neck, and then just gently rub the mitt with the leftover tanner over my face. After tanning my arms, I take off the mitt and use a cotton ball with some tanning mousse on it to carefully cover the backs of my hands.
6. Now Be Patient Again!
After applying the self-tanner, I wait at least 5-10 minutes before putting on loose clothing, usually pajama shorts and a tank top. I make sure the room is cool so I don’t sweat. You want to avoid getting your skin wet for the next several hours to allow the tan to develop. So no exercising, showering, doing dishes, etc. for at least 4-5 hours. I personally wait longer than that. Some people like to rinse off the guide color after several hours, but I wait until my next shower the following day to wash it off. I have not had any issues with color transfer on my clothes with the St. Moriz tanning mousse.
When I do shower the next day and rinse off the guide color, I can see if there are any areas that aren’t as even, usually on my feet. If I have any unevenness, I lightly brush a pumice stone over the area and it evens out the color. But in general, I don’t get any streaks on my arms or legs as long as I prep my skin beforehand.
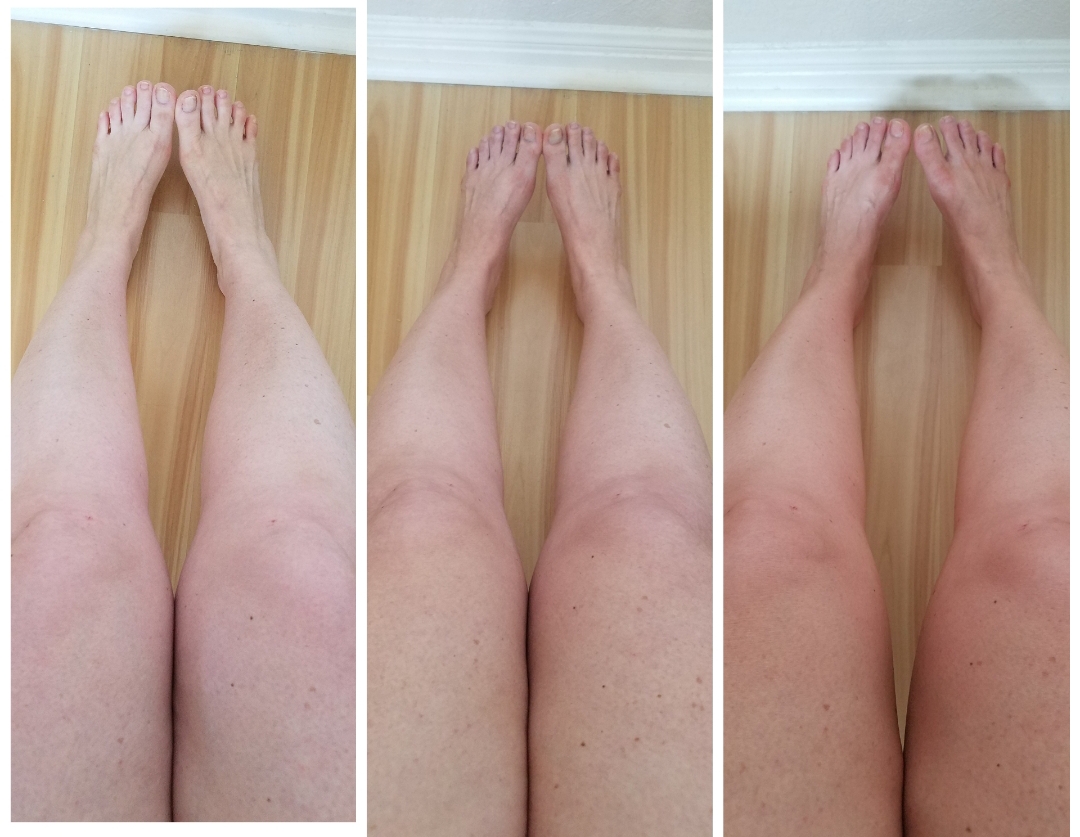
Here’s my before and after. The first pic on the left is with no self-tanner; the middle picture is after using the Medium shade from St. Moriz; the picture on the right is after using the Dark shade from St. Moriz:
Maintaining Your Self-Tan
Self tans fade quicker the more you shower, sweat, and shave. My self-tans gradually fade over about 3 days. Make sure to moisturize your skin frequently, which can help extend the tan.
Now go out there and glow!
Do you have any additional tips and tricks for self-tanning at home?

P.S. Want more tips and tricks on how to make life easier? Check out this post here.


No Comments